
Liquid Transportation 101
Welcome to Liquid Transportation 101
This training document outlines a typical Liquid Transportation asset. For this walk through we will be setting up a new asset and will cover how to set it up. For this training, we have the following data points/assumptions:
The asset will be called WES Liquid Transportation Training
They will have one receipt and delivery point (meters)
There will be two different parties invoiced (two contracts)
There will be no volume commitments
They will want to see inventory at a monthly total level
They will have monthly nominations and use a PDA method of Pro-rata (based on nom)
They will have a tariff on receipt volumes that has the following conditions at the shipper level
For volumes =< 50,000, rate = 0.5$/bbl
For volumes > 50,000 & =< 100,000, rate = 0.4$/bbl
For volumes > 100,00, rate = 0$/bbl
Any other assumptions/criteria that are needed will be mentioned throughout this training document.
How to setup a Liquid Transportation Asset
Setup a new asset

On the new asset setup screen seen below, fill out required fields indicated by the *
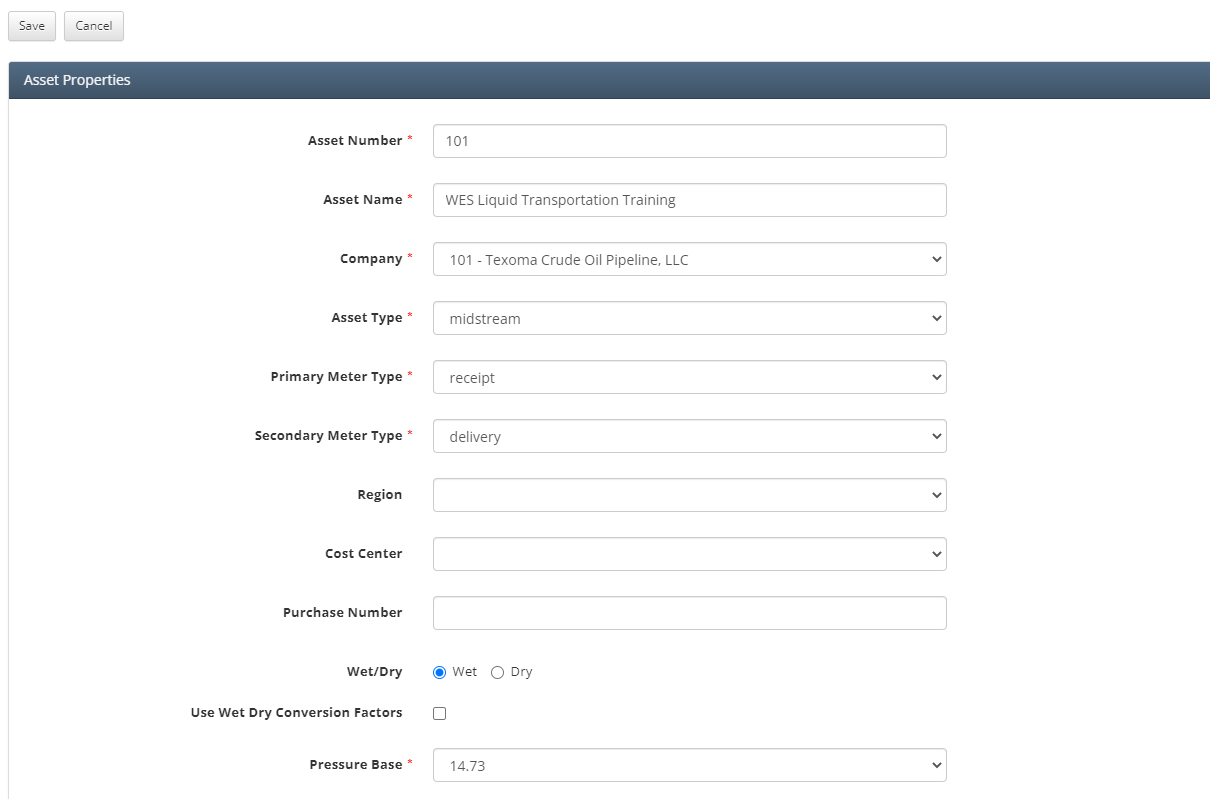
Here the user would set up the Asset Number, Name, and Company has directed by the client. Asset type is set to midstream as liquid transportation is apart of midstream. It is common practice to set primary and secondary meter types as receipt and delivery respectively.
Setup Code Tables necessary for Liquid Transportation
Global Setup / Code Tables / Products
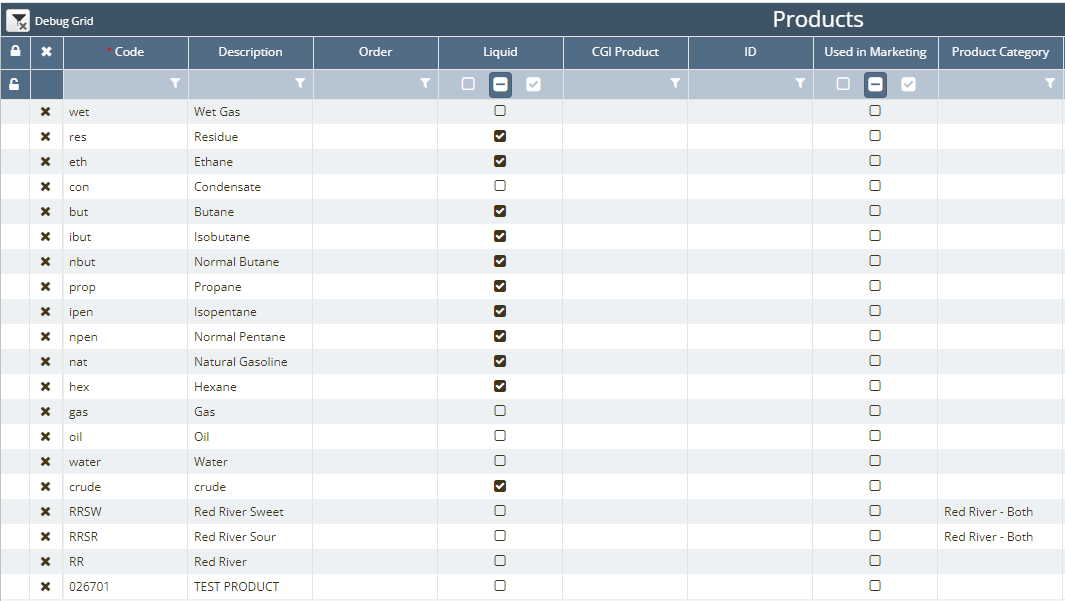
This code table is used to define the products that the client has in their system, this is at a global level so once they are setup here any asset can utilize the products.
Global Setup / Code Tables / Usages
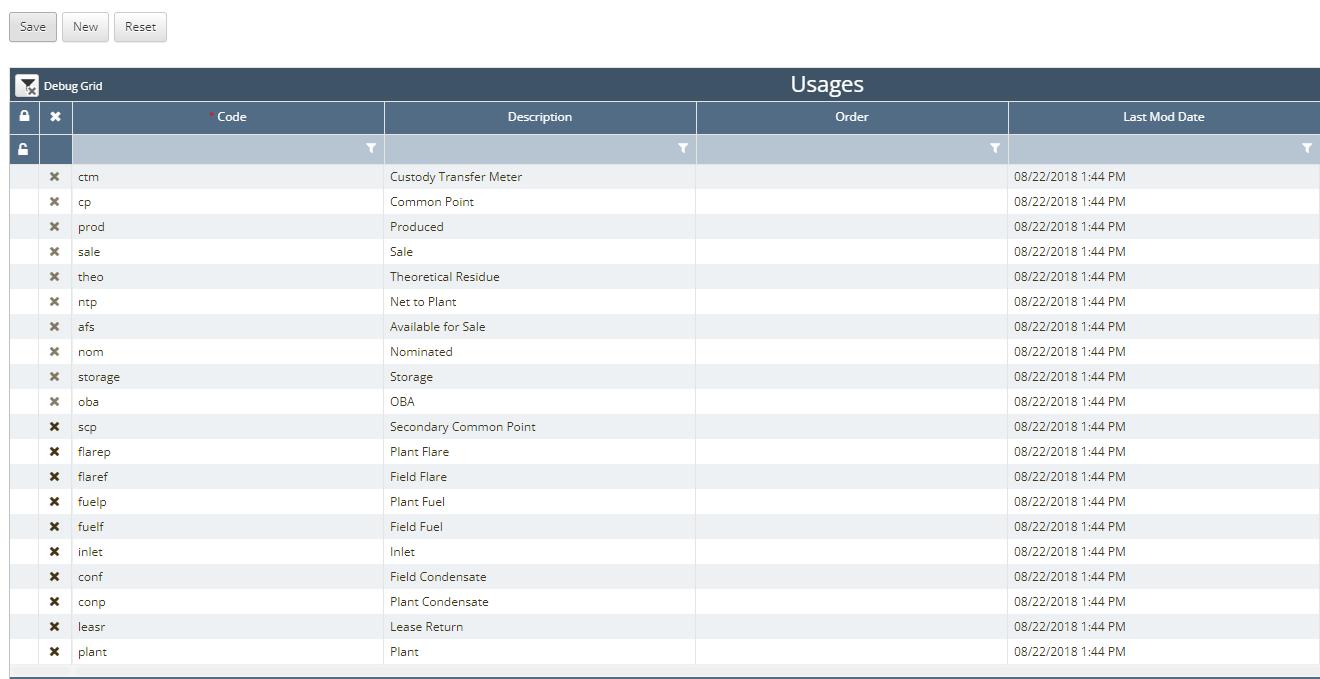
This code table is used to define the usages that will be needed for a particular asset. The primary ones being receipt, delivery, storage, linefill, gain/loss, and nom are setup automatically when a clients environment is initially configured.
Global Setup / Code Table / Visit Statuses
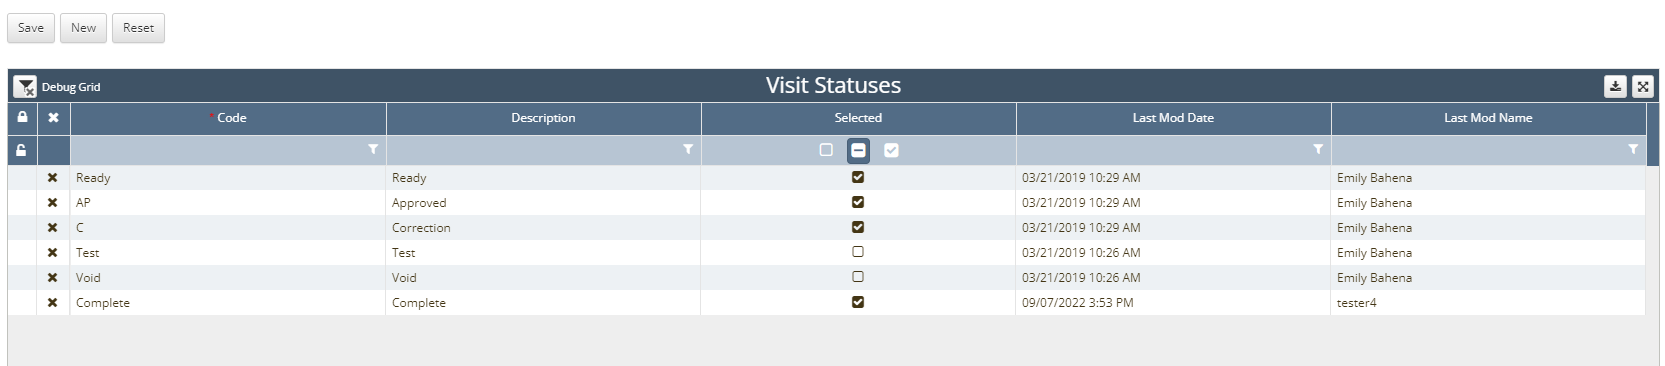
This code table is used with the run ticket grid to identify what visit status a ticket can have. If a visit status is entered in on a run ticket but not setup here then the system will return an error noting that.
Global Setup / Business Associates
Business associates are used to include all parties that could play a role in who is being invoiced, who is the supplier of the product, who is the carrier of the product and so forth.
The main role for Business Associate is Contract Party and that is what allows that BA to be assigned a contract.
Asset Setup / Product & Usages
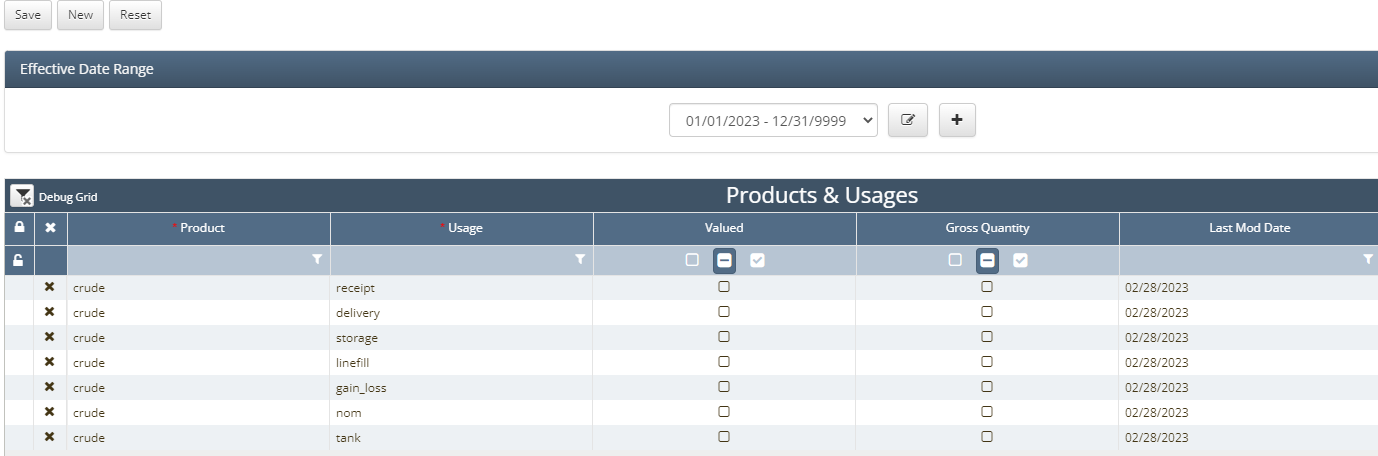
Product & Usages is at an asset level and this tells the system, for this particular asset what product is going to be used here and then for the product the different usages it could have. It is typical for each product to have a usage of receipt, delivery, storage, linefill, tank, gain/loss, & nom.
For this example the only product for this asset will be crude.
Once setup the Products & Usages can utilize the time slice functionality, this is useful in the scenario where another product is introduced to the asset, the client can end date the old setup and create a new time slice with the new setup.
Asset Setup / Inventory Adjustment Setup
Inventory Adjustment Setup is used to control how certain product usages will effect inventory
Navigate to Asset Setup / Inventory Adjustment Setup and add in rows for the different usages that will need to be setup for inventory adjustment.
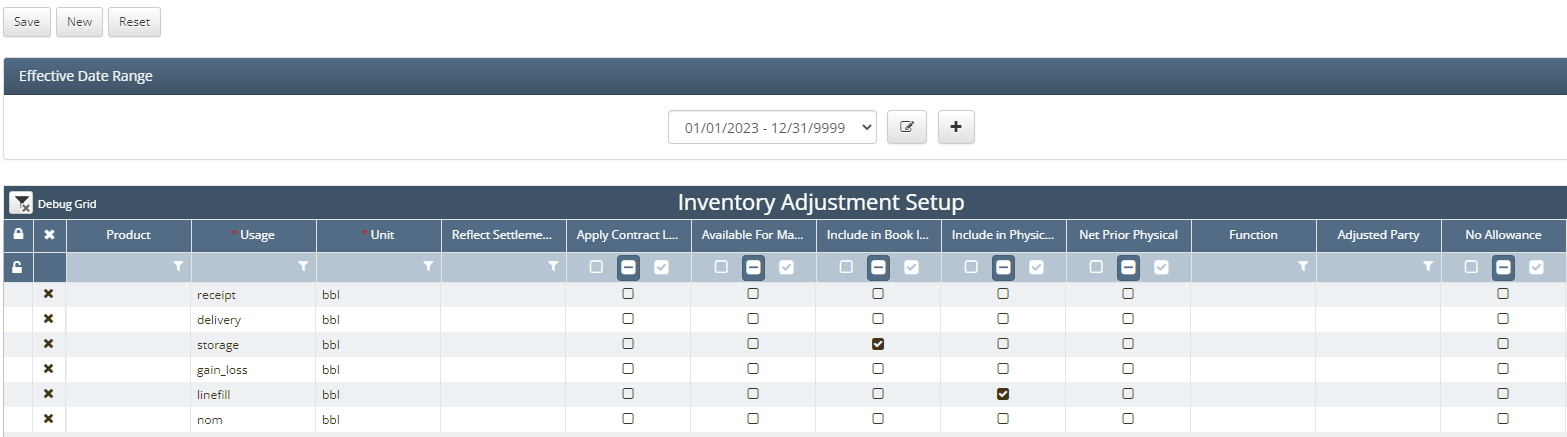
Important to note that nom is required here in order for nominations to be setup.
For additional information on what each column drive within the application, please review training page. Asset Setup / Inventory Adjustment Setup
Physical Setup / Meters
As stated in the assumptions, this Liquid Transportation asset is going to have one receipt and delivery meter.
First navigate to Physical Setup / Meters and click the ‘New Meter’ button and the following pop-up will appear.
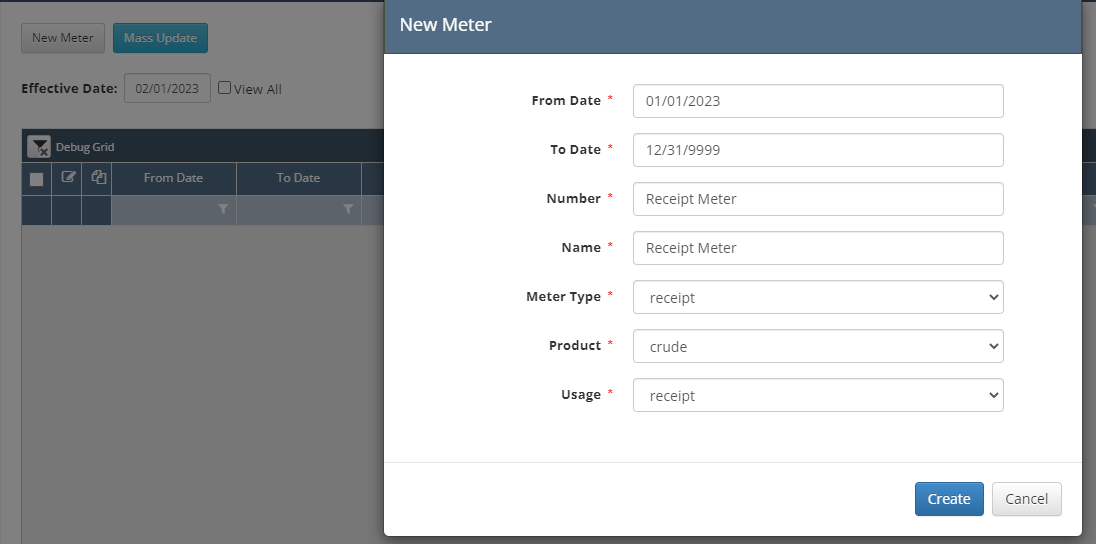
Setup the correct From and To Date, enter the necessary meter Name and Number, from there this is a receipt meter type for a product of crude and its usage is set to receipt.
Important to note that the options for Product & Usage are dependent on what was setup under Asset Setup / Products & Usages.
Next, repeat the same process for the Delivery meter making the necessary updates to the fields above.
Physical Setup / Groups
Once you have created the meters, if they are to be assigned to a group then a group can be created. We would typically see this for a Liquid Transportation asset if there were multiple receipt or delivery points for a common receipt or delivery point.
To create a group, navigate to Physical Setup / Groups and click ‘New Group’.
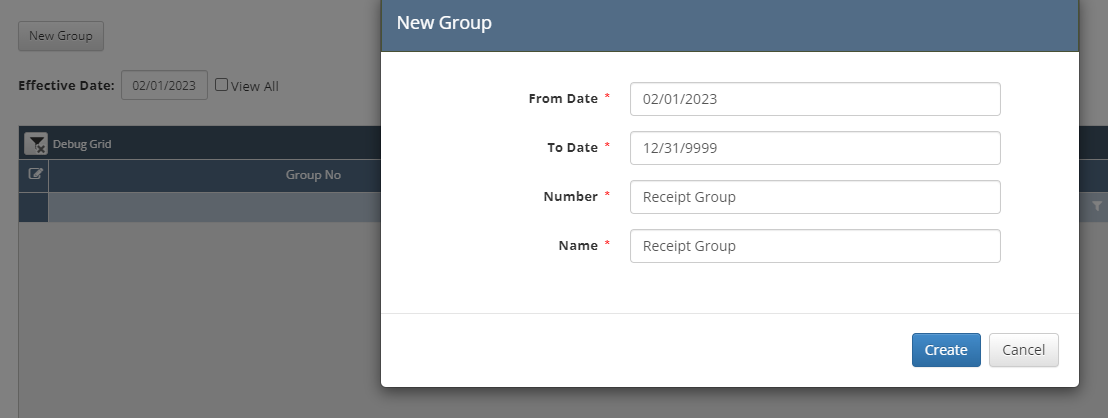
Set up the group as directed by the client and after clicking ‘Create’ the following screen will pop-up.
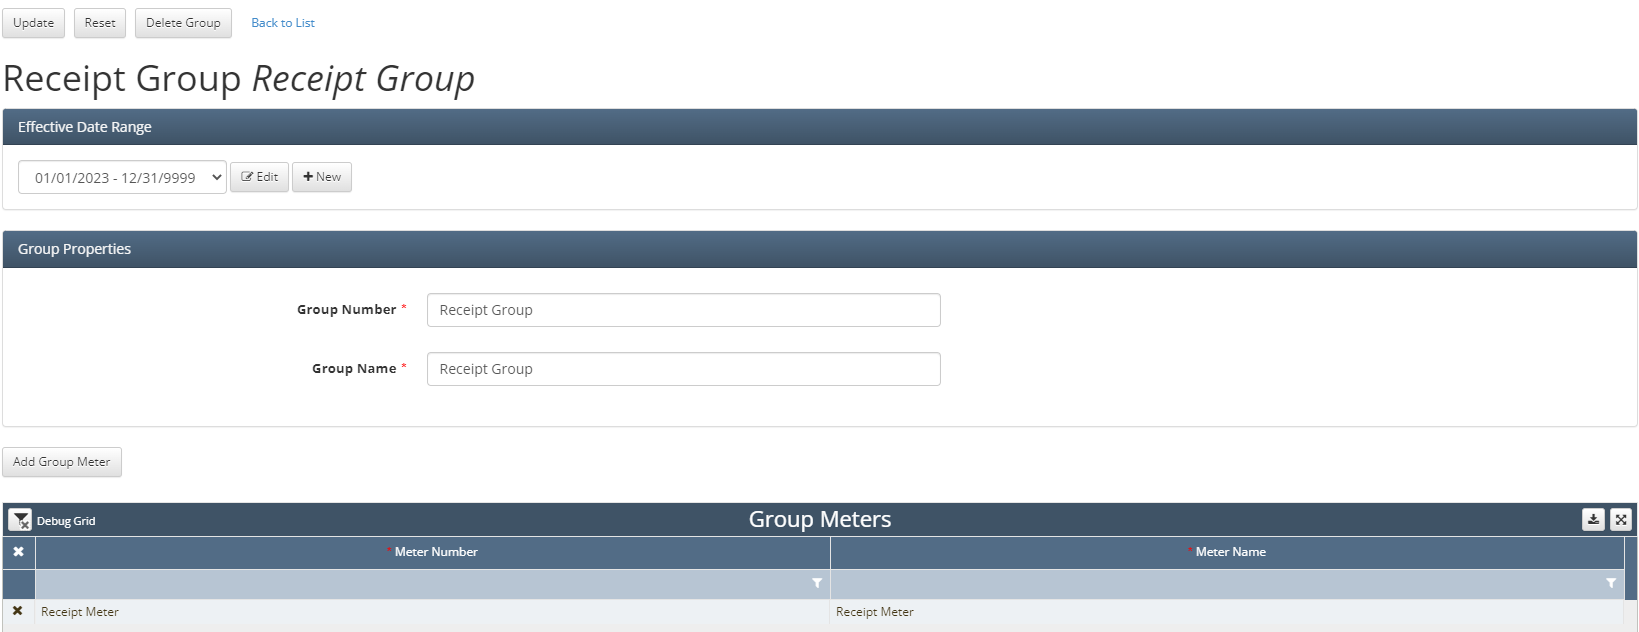
From here simply click ‘Add Group Meter’ and add the meters that are set to be within this group.
Asset Setup / Transportation Setup
The next setup piece is to configure the Transportation Setup page for the asset.
Navigate to Asset Setup / Transportation Setup and this page will be configured as such for this asset.
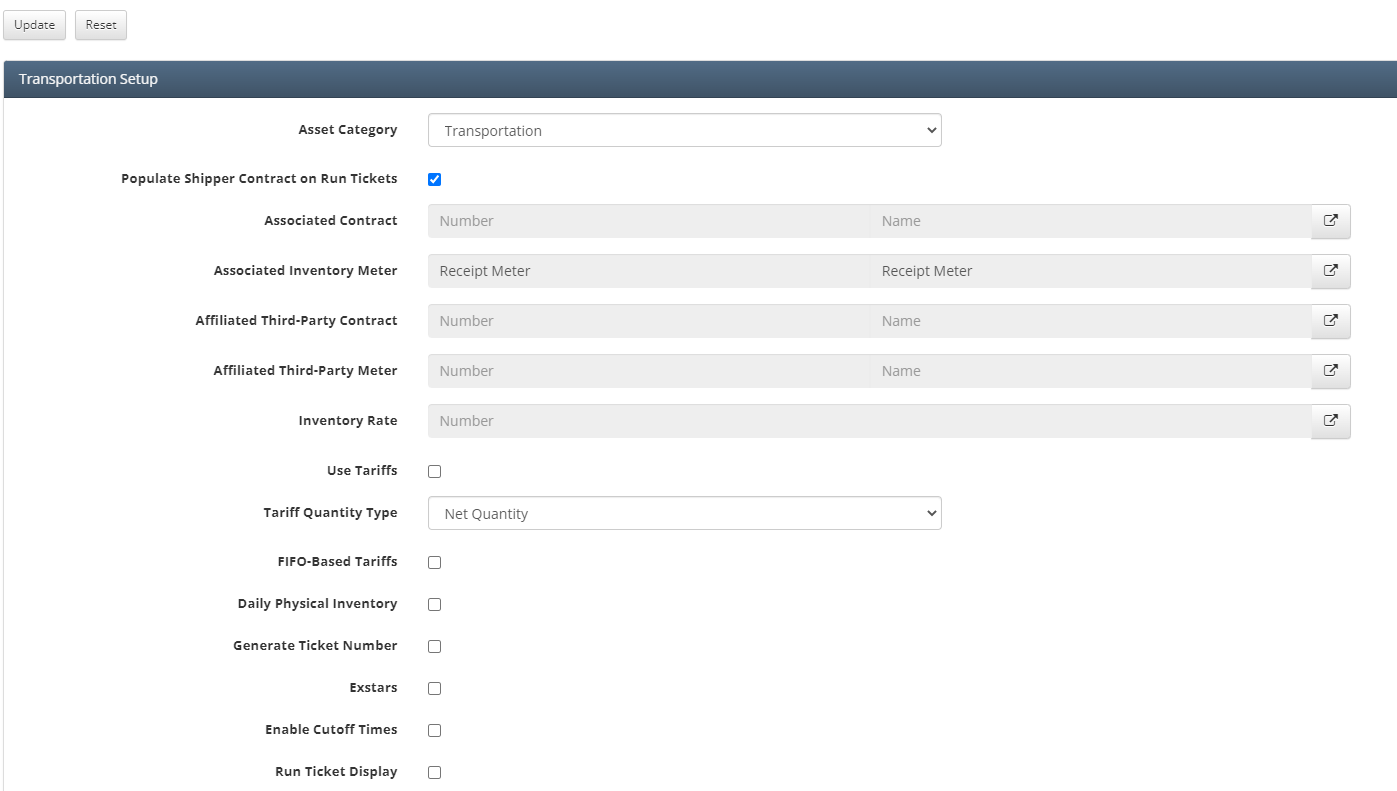
Main items to note here is that Asset Category is set to transportation and that that receipt meter is used as the associated inventory meter in this case.
The next piece on this screen is to setup the run ticket units as such:
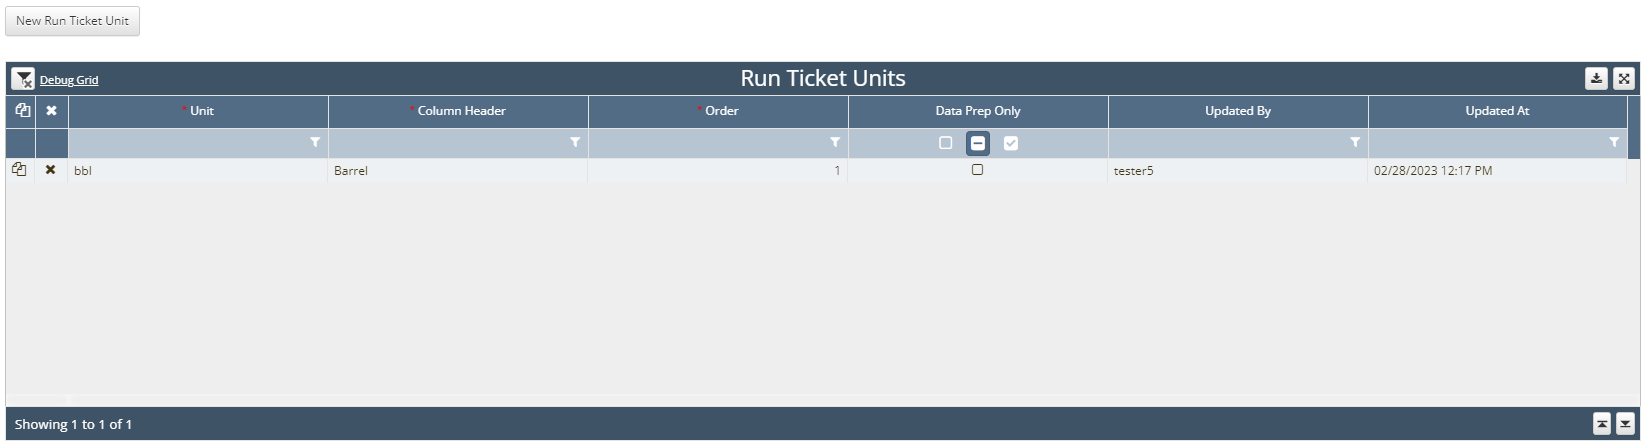
If there were to be more than one unit used then it could be added using the ‘New Run Ticket Unit’ button.
For additional information on what each field in this screen means please refer to training page Asset Setup / Transportation Setup.
Liquid Trans Setup / Transport Allocations
The next setup piece is to configure how allocations will work for this liquid transportation asset
Navigate to Liquid Trans Setup / Transport Allocations and the system, upon creating a new asset, will be setup as such:
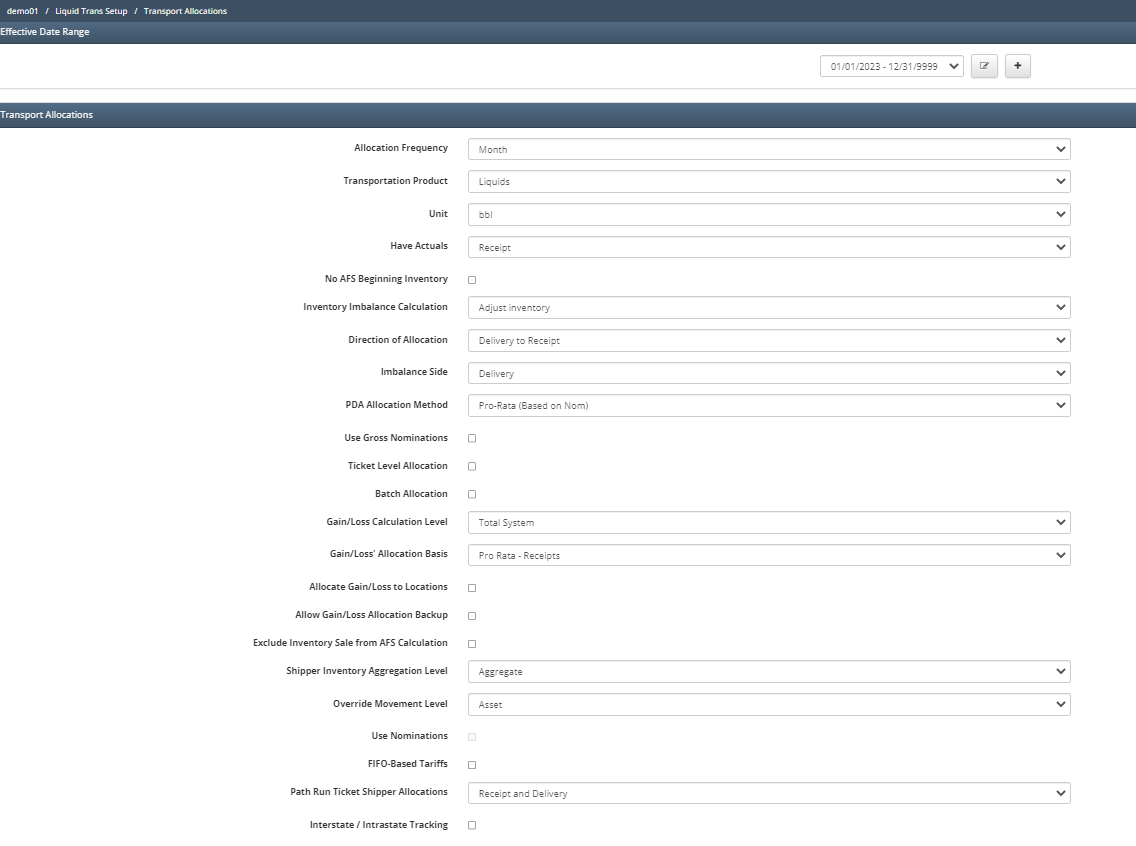
This configuration screen impacts how the system will handle allocations for this asset. There are a multitude of different ways for this screen to be configured, all dependent on what the clients need. The below shows how it would be setup for a typical asset:
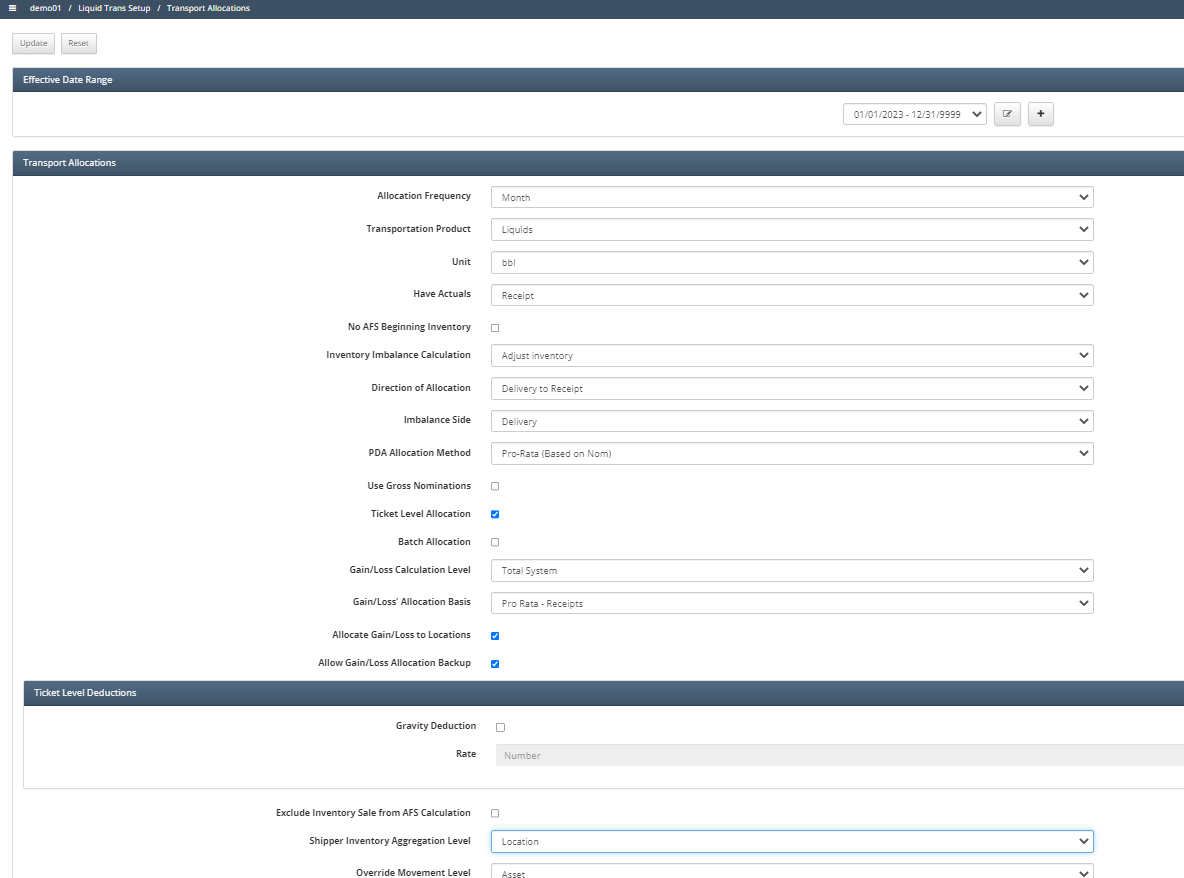
For additional information on what each field in this screen means please refer to training page Liquid Trans Setup / Transport Allocations.
Liquid Trans Setup / Nomination Configurations
The next setup piece is to configure how nominations will work for this asset
Navigate to Liquid Trans Setup / Nomination Configuration and the system, upon creating a new asset, will be setup as such:
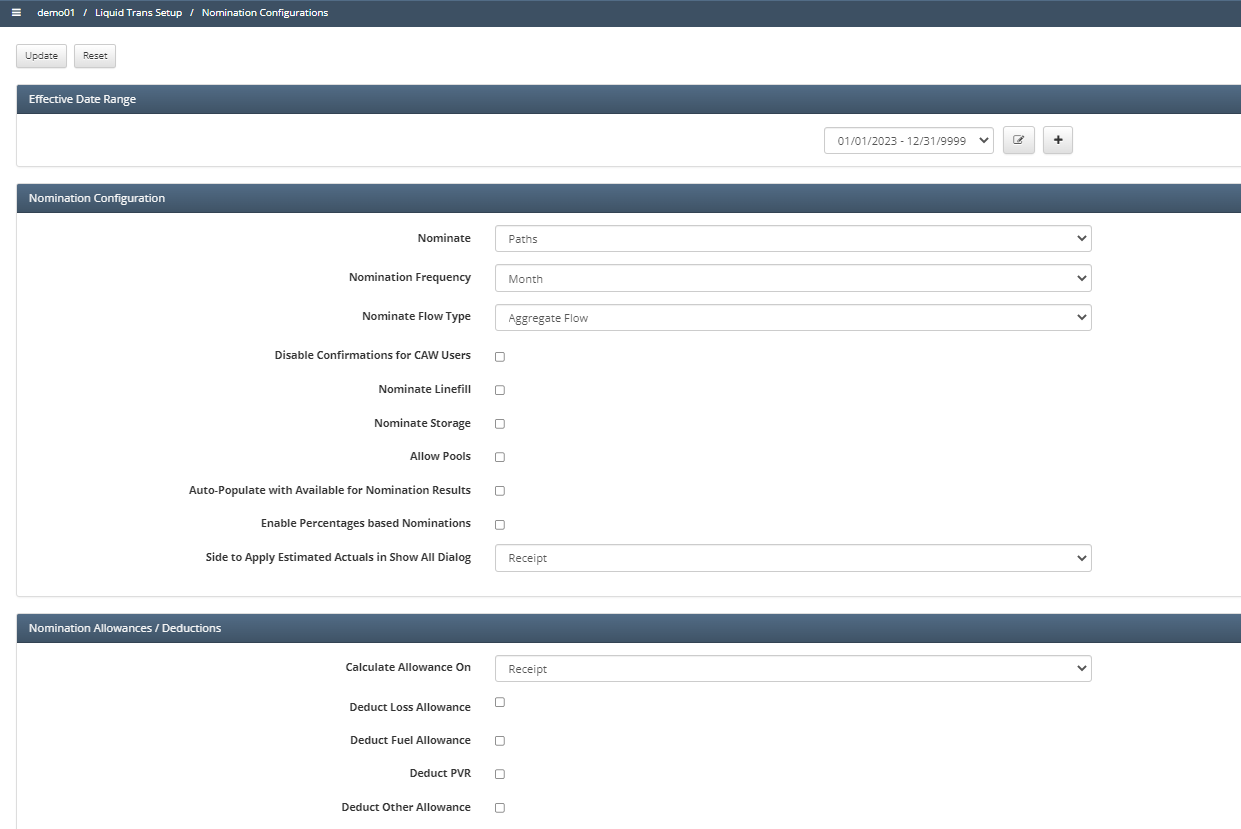
This configuration screen impacts how nominations will be setup and any allocations that could be based on them. There are a multitude of different ways for this screen to be configured, all dependent on what the clients need. The below shows how it would be setup for a typical asset.
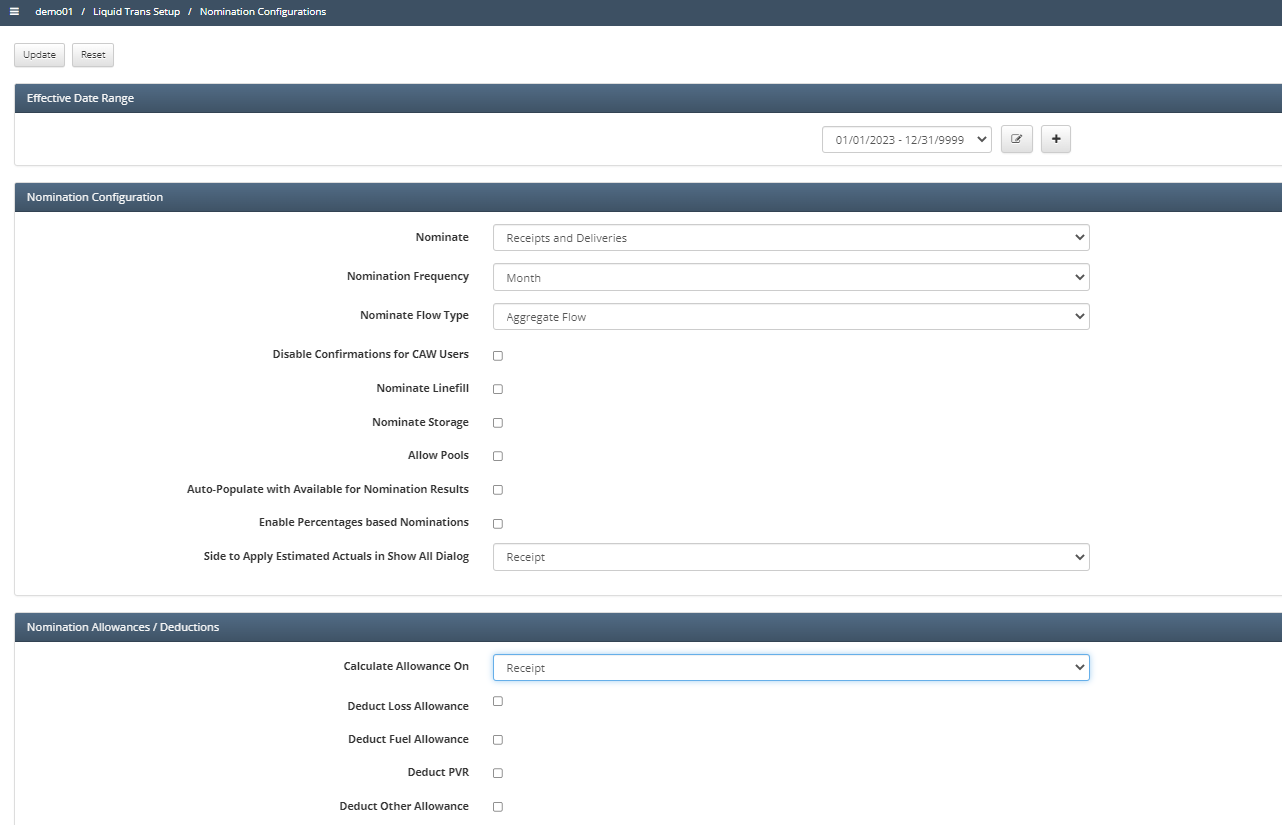
The main fields to note here are Nominate and Nomination Frequency, for this asset as stated in the assumptions they will have monthly nominations and the system will be nominating on receipts and deliveries.
For additional information on what each field in this screen means please refer to training page Liquid Trans Setup / Nomination Configuration.
Liquid Trans Setup / Gathering Cycles
The next setup piece that is related to nominations is to create a Gathering Cycle.
Navigate to Liquid Trans Setup / Gathering Cycles and click ‘New Gathering Cycle’.
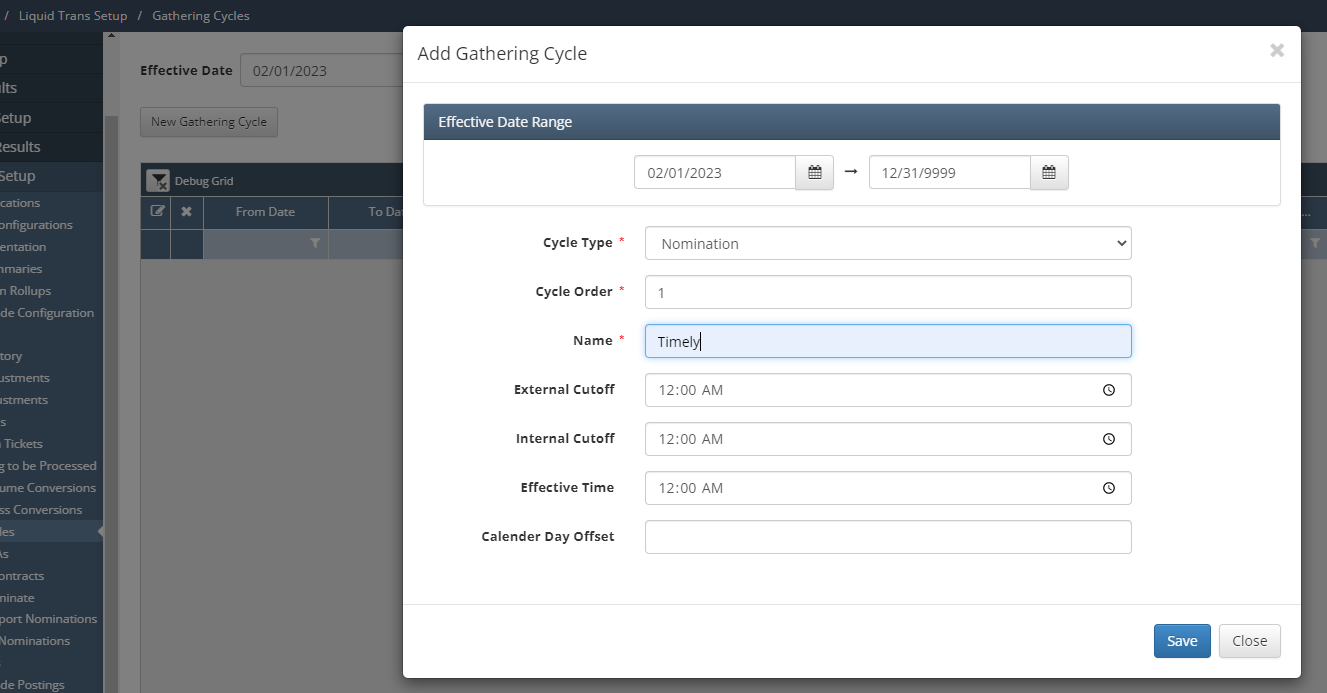
The above pop-up will appear for the user to setup the Gathering Cycle, once setup, click ‘Save’.
Gathering Cycles are used to define the rules around when a shipper can nominate and make nomination changes.
For additional information on what each field in this screen means please refer to training page Liquid Trans Setup / Gathering Cycles.
Liquid Trans Setup / Tariffs
The next piece of setup will involve creating the tariff for this Liquid Transportation asset.
Please review the criteria for the Tariff outlined at the beginning of this training document.
Navigate to Liquid Trans Setup / Tariffs, once there click ‘New Tariff’ and the following pop up will appear:
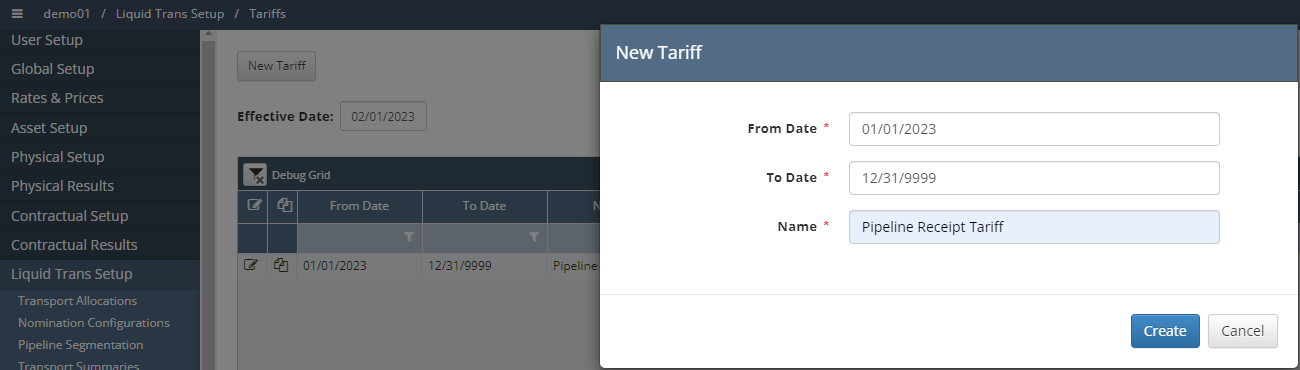
Once the dates and name have been populated, click ‘Create’ and the application will take you to the Tariff setup screen seen below:
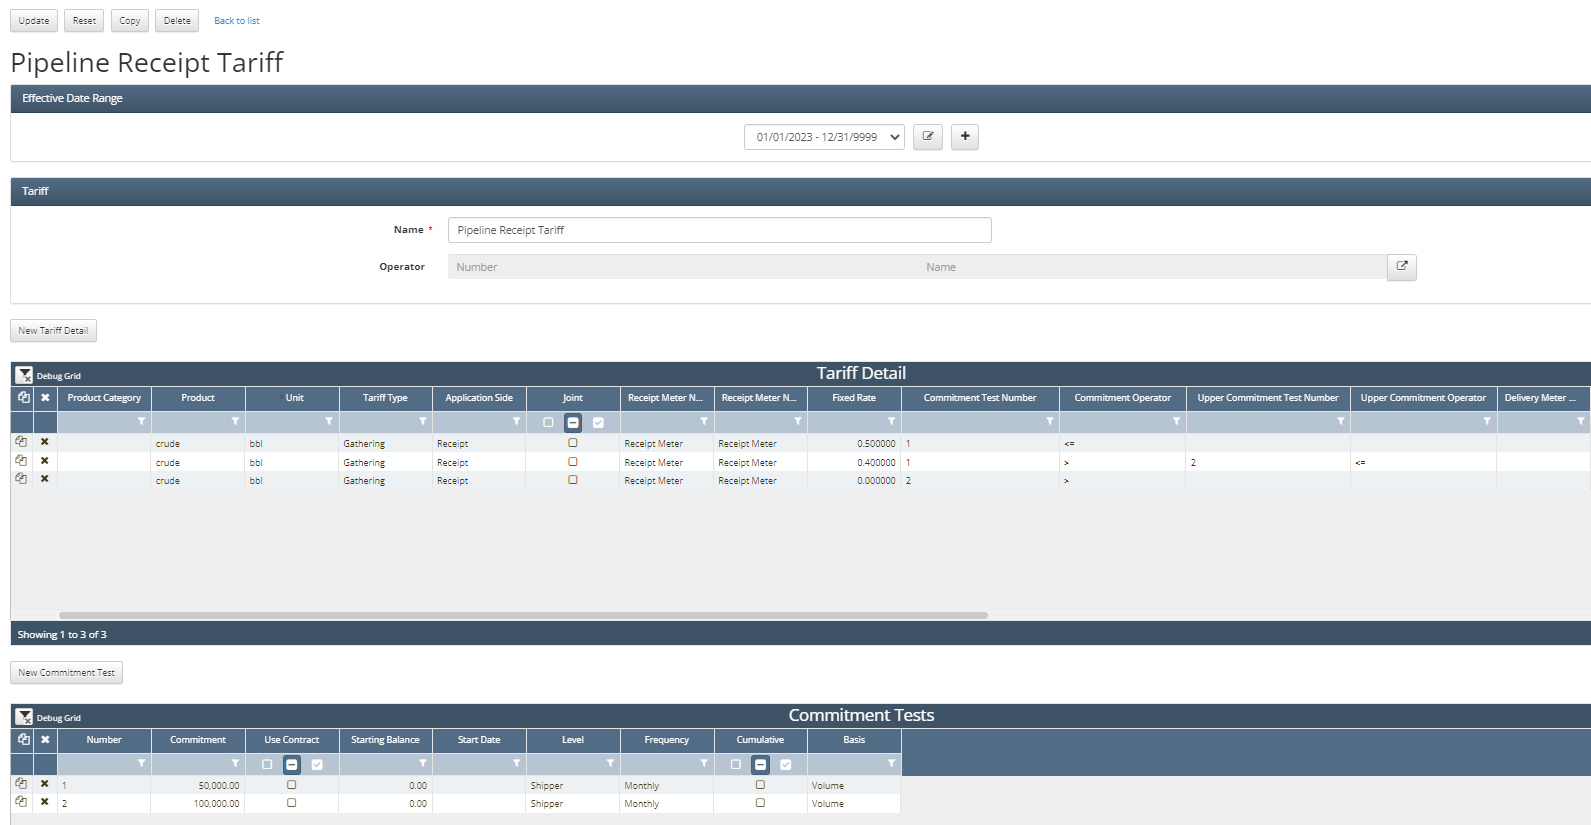
Here the tariff has been setup based on the criteria that was outlined above:
Since the rate changes when volume exceeds 50,000bbl and then again when it exceeds 100,000bbl, this tells the user they will have two commitment tests, one for each volume.
It was also stated that these are per month and applied to each shipper not the asset as whole.
Once the commitment tests are setup, then the user can move on to setting up the Tariff details.
The tariff is for a product of crude, in units of Bbls, on receipt volumes only. That information is what was used to populate the following fields:
Product
Unit
Application Side
Receipt Meter Number
From there the next step is to setup the tariff in order for it to evaluate volumes as directed by the contract.
The first line item uses Commitment Test Number = 1, this is referencing the commitment test that was setup with 1 and then uses the operator sign of =<, with a fixed rate 0.5. This means that for volumes that are less than or equal to commitment test 1 (50,000bbl) they will be applied a rate of 0.5$/bbl.
The second line item uses a commitment test number = 1 and then a operator sign of greater than, it then has an upper commitment test number of 2 with an upper operator since of =<, with a fixed rate of 0.4. This means that for volumes that are greater than commitment test 1 (50,000bbl) and less than or equal to commitment test 2 (100,000bbl) they will be applied a rate of 0.4$/bbl.
The third line item uses a commitment test number = 2 and then an operator sign of greater than with a fixed rate of 0. This means that for volumes that are greater than 100,000bbl they will be applied a rate of 0$/bbl.
Important to note that this is not cumulative, this does not mean that if the total volume is greater than 100,000 bbl the customer gets applied a rate of 0$/bbl. This means that once that total volume for the month reaches the first commitment test (50,000bbl) the following barrels will then be at the reduced rate of 0.4$/bbl.
For Example, if a customer had 120,000bbl of crude come through the pipeline in a given month, they would be charged 50,000bbl @ 0.5$/bbl, then 50,000bbl @ 0.4$/bbl, and then 20,000bbl @ 0$/bbl.
For additional insight on how Tariffs work, please review training page Liquid Trans Setup / Tariffs.
Contractual Setup / Contracts
The next setup piece is to create the contracts that are needed for this asset, as outlined in the assumptions, this asset will have to contract parties that will be invoiced.
Navigate to Contractual Setup / Contracts and click ‘New Contract’ and the following pop-up will appear:
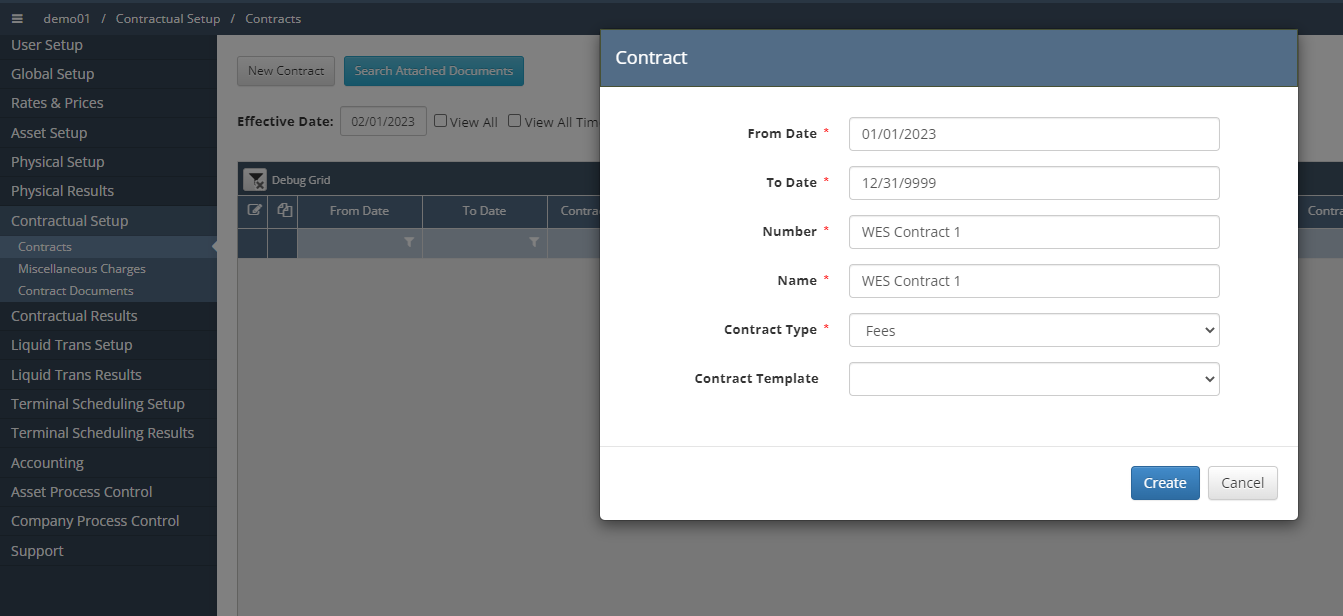
Fill out the necessary information, dependent on what the client requests and then click ‘Create’ and the system will take you to the following screen:
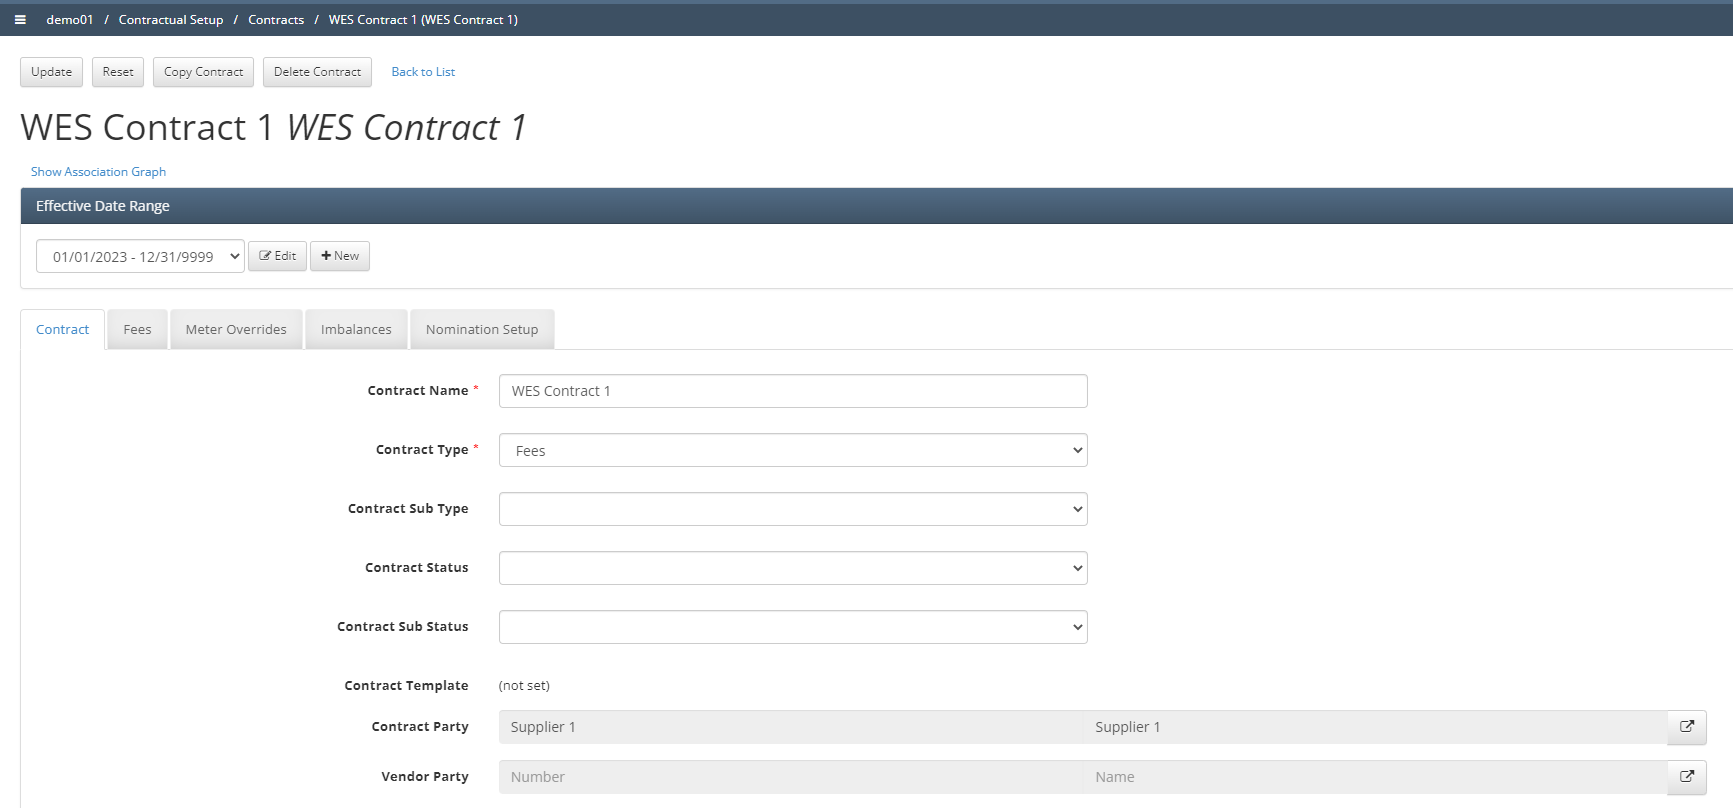
Once you are within the contract setup page, it initially only has the Contract tab, in order to have the other tabs shown (Fees, Meter Overrides, Imbalances, & Nomination Setup) the user will need to check the respective boxes found towns the bottom of the contract tab and then click update.
The main tab that is required in order for the system to function is the Nomination Setup Tab, this is where the user will assign specific meters to the contract as seen below:
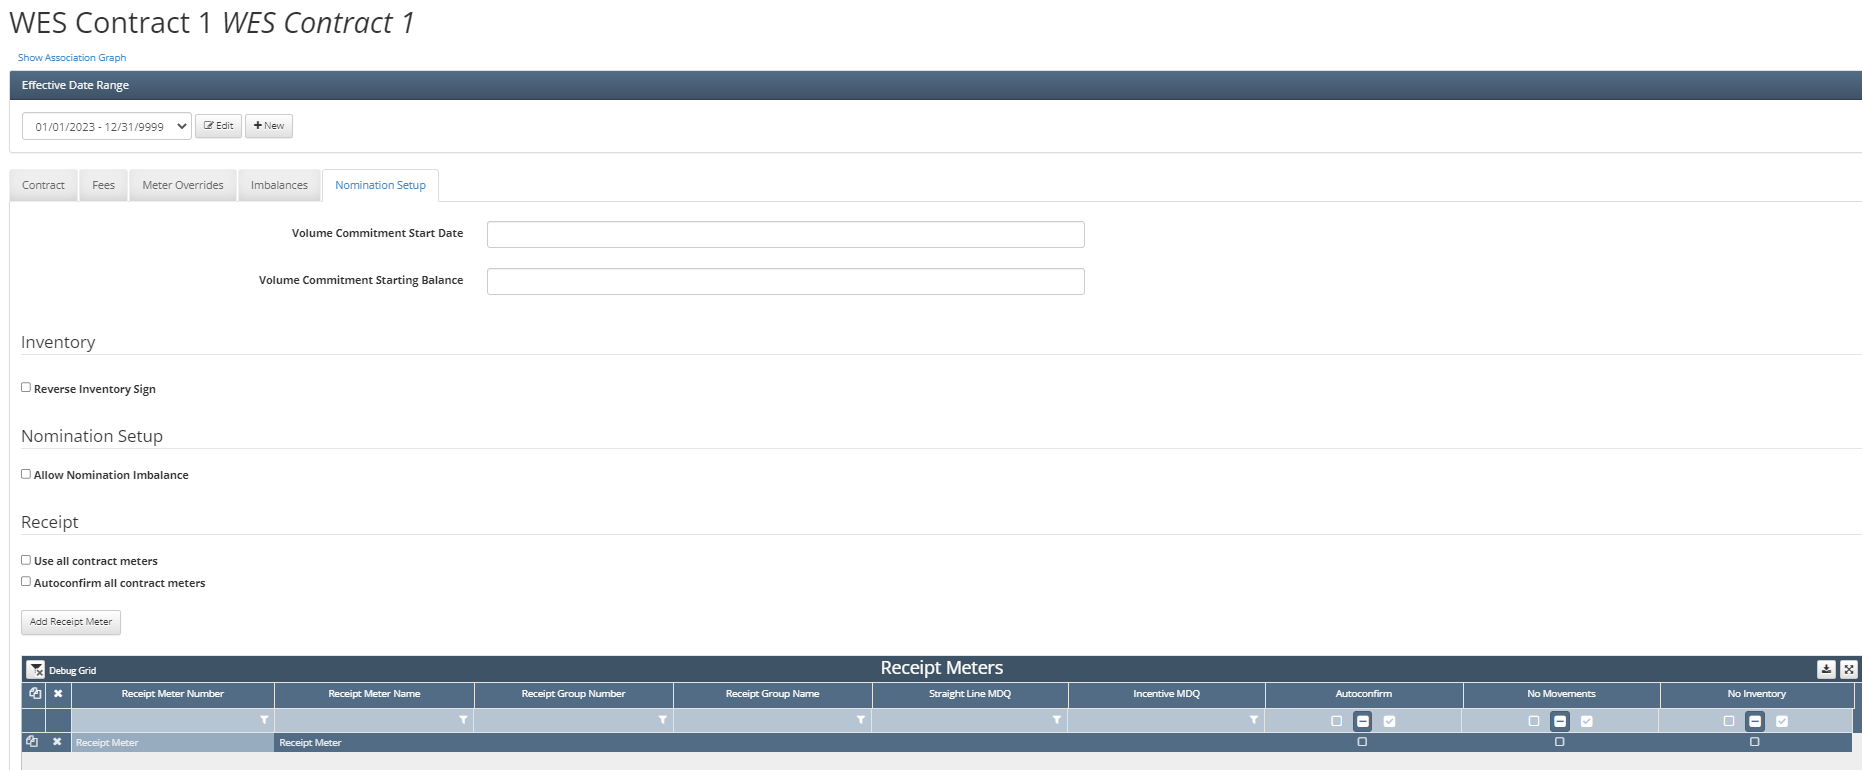
The user would need to add all receipt meters associated with this contract and then below that grid there is one for deliveries as well. Since this asset only has one of each, there will only be one meter setup under Receipt and Delivery Meters. Once you have your nominations setup complete, click Update for the contract.
Liquid Trans Setup / Transport Nominate
There are two ways to enter nominations into the W Energy application; manually or via an upload.
As stated in the assumptions for this training example, this asset will be evaluating nominations for receipts & deliveries on a monthly basis.
First, navigate to Liquid Trans Setup / Transport Nominate and click ‘Receipt and Delivery Nomination Upload Template’, this will download the template that needs to be used to upload nominations.

Once downloaded, fill out the template with the necessary information.
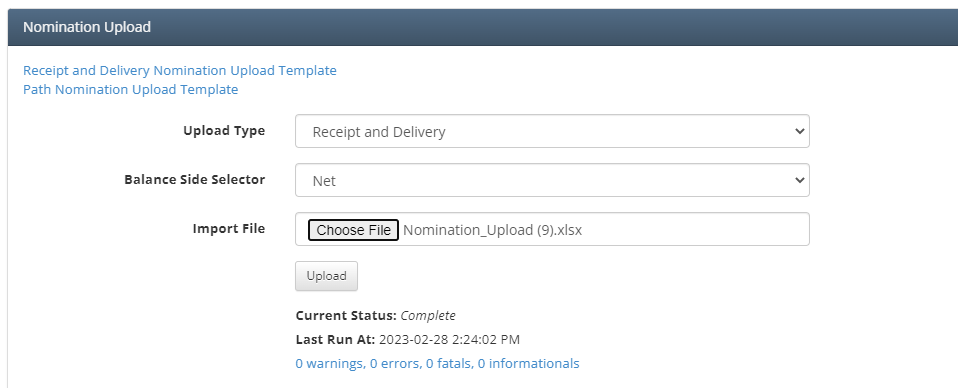
Once the template is populated, it is ready to be imported into the application. Under upload type select ‘Receipt and Delivery’, Balance Side Selector set to ‘Net’, and then select the correct import file and click ‘Upload’.
Once uploaded then the user can view the nominations in this same screen. There is the Shipper Contracts grid where they can filter by asset and contract number and make any edits or updates to nominations.
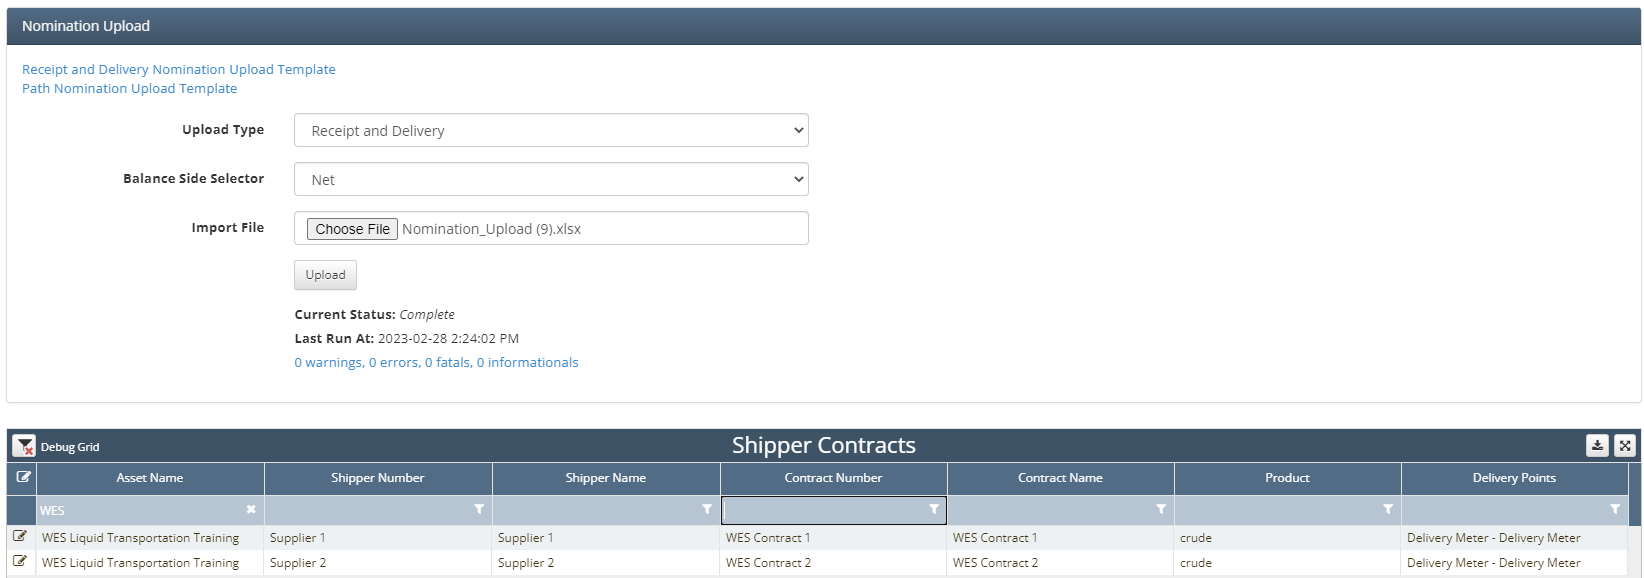
Next, click the edit icon and it will open up the nominations where the user can view them and make any updates needed.
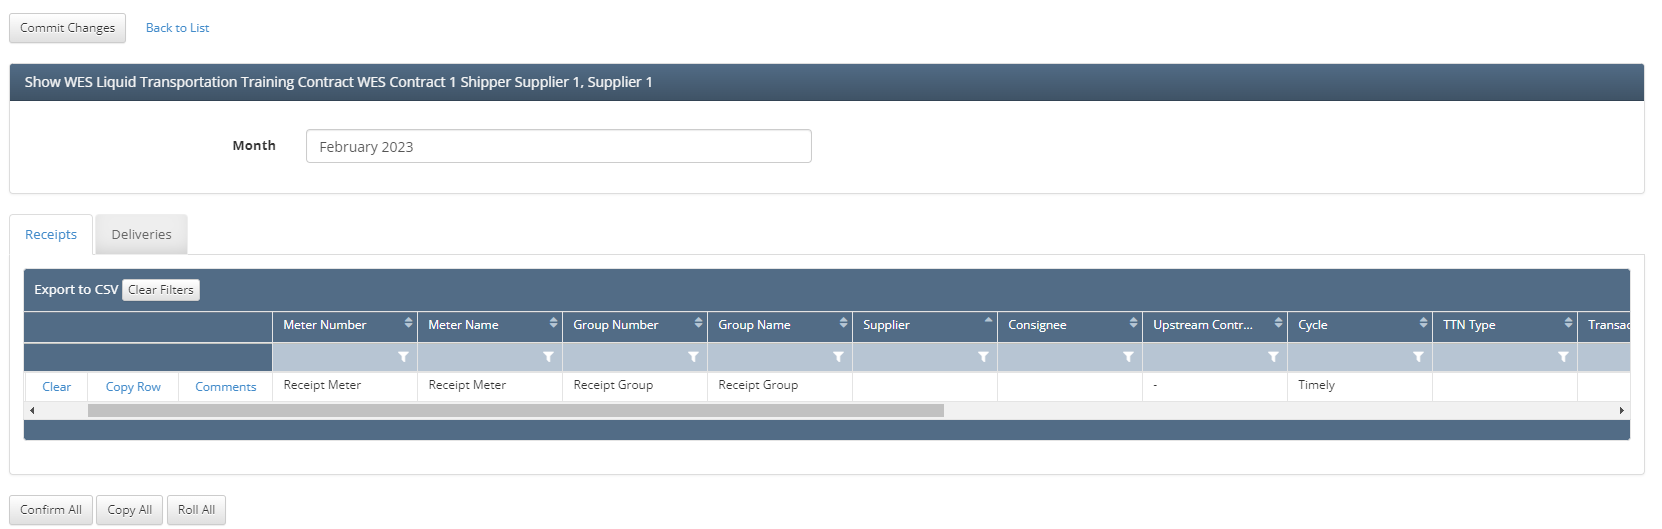
There will be a tab for Receipts and Deliveries and the user can make updates to existing nominations or add new ones for a new month by changing the month seen at the top of the screen.
For additional information on how to import nominations and edit existing ones, please review training page Liquid Trans Setup / Transport Nominate.
Liquid Trans Setup / Transport PDAs
Transport Pre Determined Allocations (PDAs) are used to allocate actual measured volumes for the different shippers at the asset when ticket data does not include shipper information. If volumetric data is tied to a shipper when it is entered then that overrides and PDAs that have been setup. If volumes are not tied to specific shippers (contracts) when they are entered then PDAs will be used to allocate measured volume to the suppliers. Additionally, some PDAs are based on nominated volumes for each shipper, the PDA method for this training asset is based on each respective shippers nominations, Pro-Rate (Based on Nom).
Navigate to Liquid Trans Setup / Transport PDAs, the application will take you to a screen that has tabs for Receipt, Delivery, & Shipper.

From here, the user will want to select ‘New Receipt PDA’ and fill out the necessary information seen below:
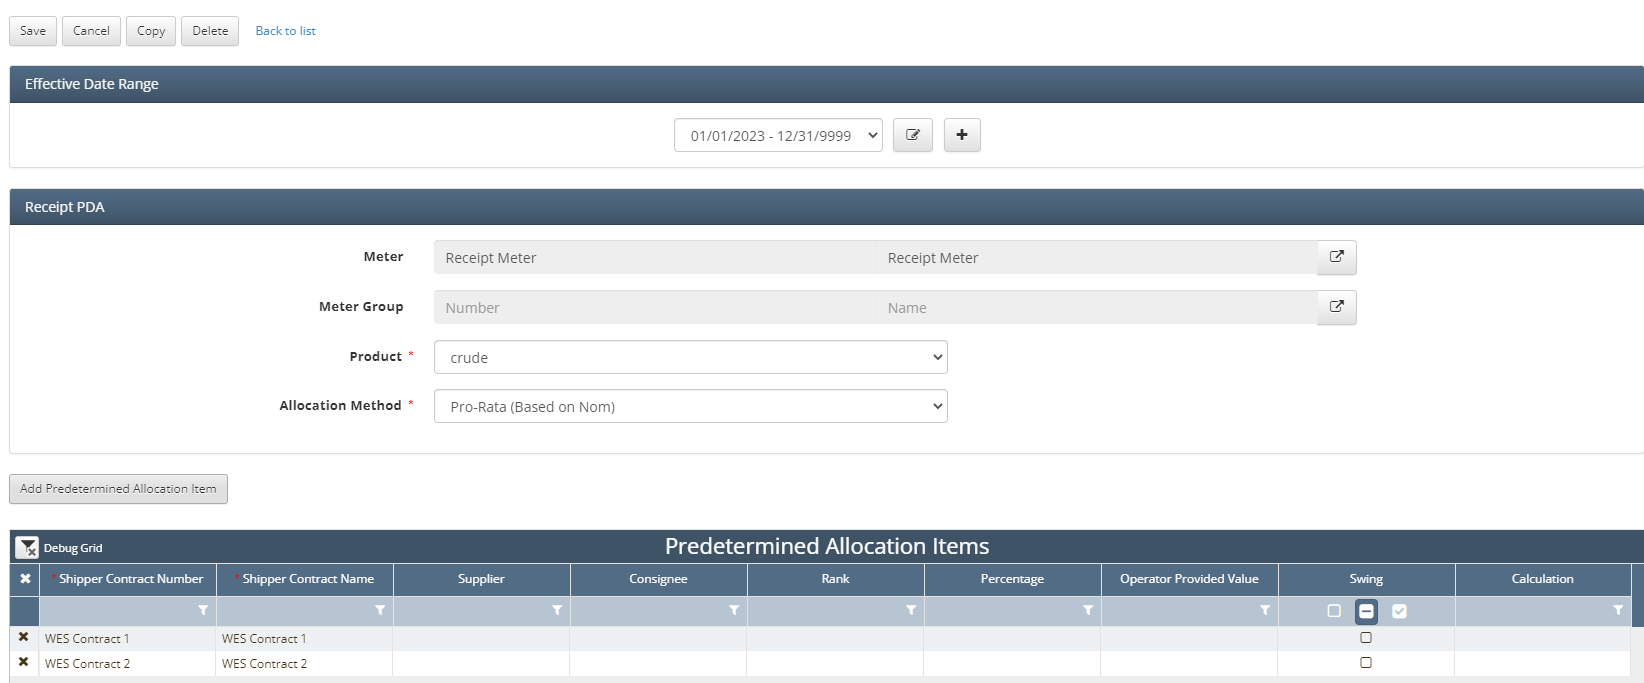
Here we select our receipt meter as that is the meter that receipt volumes and nominations will be entered on. From there we select a product of crude and an allocation method of Pro-Rata.
Next the user will need to ‘Add Predetermine Allocation Items’, one for each shipper that will be included in the receipt PDA.
Next repeat the same process except for the Delivery PDA, changing the meter to be the Delivery Meter.
For additional information on how each PDA method works and how to set them up, please refer to training page Liquid Trans Setup / Transport PDAs.
Physical Setup / Run Tickets
Run tickets are used to enter volumetric data into the W energy application. Run Ticket data can be inputted into the system in multiple ways but the two main ones are to manually create a ticket and to use the run ticket import template.
In either case, the user must first navigate to Physical Setup / Run Tickets, once there click the ‘File Upload’ button in the top left hand corner to show the upload option. This is where the user can click ‘Run Tickets Template’ that initiate the download of the template for the user to populate.
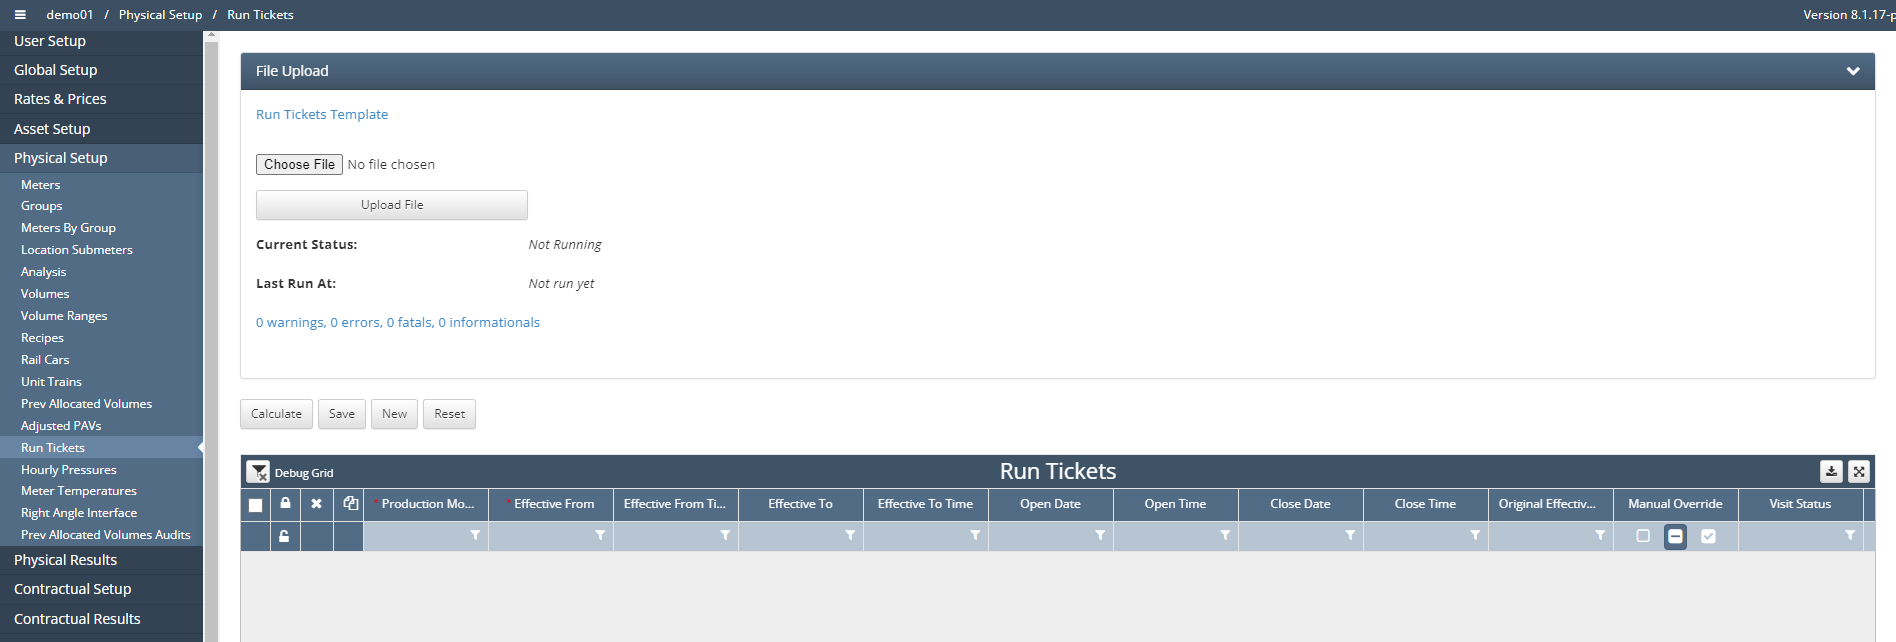
Once downloaded the user can open up the excel template file to begin populating. The file comes with following three sheets:
Intro: Provides information on what fields are required and what each field is referring to
Tickets: This is main sheet where user will post run ticket data
Component Volumes: This sheet can be used for multiple reasons but its primary purpose is to include component volumes.
A ticket entered on the Tickets sheet could be for a blended product and then on the component volume sheet the user could reference the same ticket and have the volume broken out by component.
There are over 100 different fields that can be populated via the run ticket template so for the purpose of this training we will strictly cover the most used/important fields (* means that this field is a required field and can not be left null).

Ticket Number*: Unique number to identify a ticket
Visit Start Date*: Date the ticket is effective from
Visit Status*: Must match a given value setup in Visit Statues code table
Meter Number*: Meter that the ticket should be associated with
Product*: Product that the ticket volume represents
Parent Product: If the product is the component of another then include the parent product here
Net Volume: Net Standard Volume for the associated ticket
Ticket Type: Receipt or Delivery
Batch ID: Identification number tied to a batch of pipeline tickets
Contract Number: Contract that the ticket/volume is assigned to
Load Date: Information field to record date of the movement
Load Time: Information field to record the time of the movement
Carrier Mode: Must match a given value setup in Carrier Mode code table
Lake Escape!: Matched against a BA number, typically the contract party of the contract that it is assigned to
Lake Escape!: The unit of measure that the volume is recorded in
Once the run ticket template has been populated, the next step is for the user to upload the file. Click ‘Choose File' and select the correct file that needs to be uploaded. Upon selecting the file click the ‘Upload File’ button to initiate the upload process.
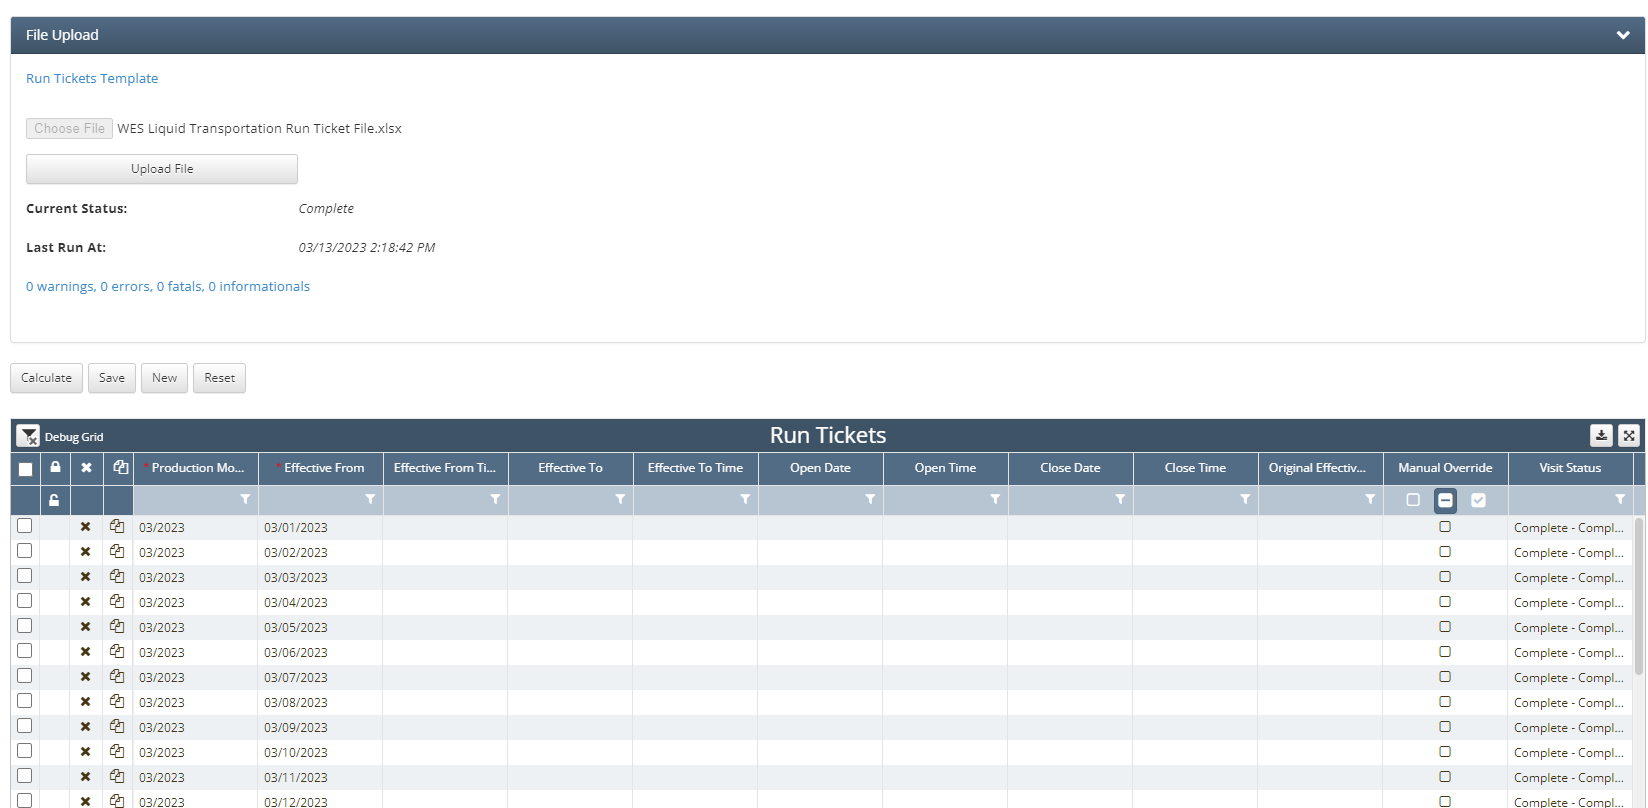
Once the upload is complete the system will update the Current Status, Last Run At, and provide an error log including information on any warnings, errors, fatals, or informational that were generated during the upload process.
The process to enter a ticket manually starts with clicking the ‘New' button and this will create a new line item at the bottom of the run ticket grid.
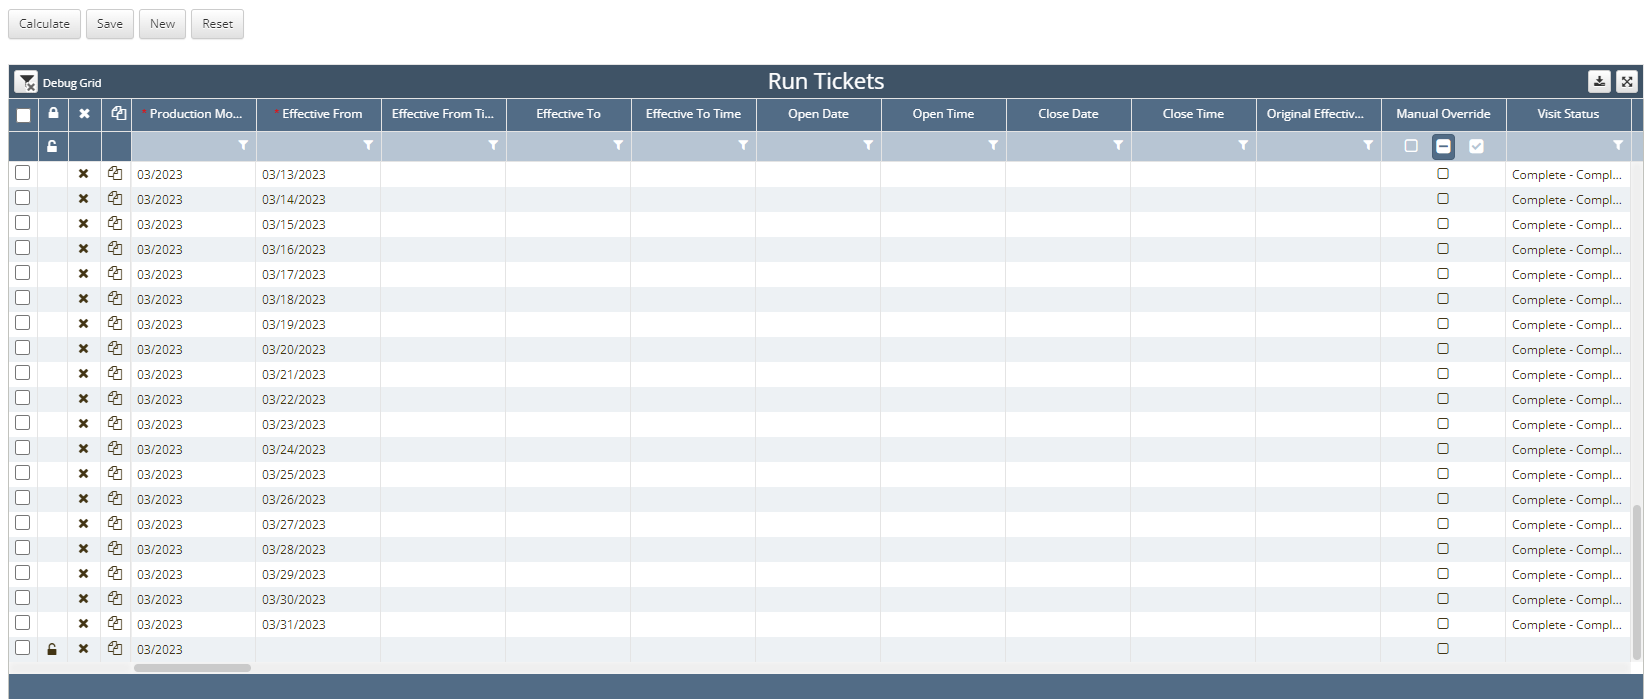
The new entry is noted by the lock key in black next to that line item. This indicates that there is a new entry that has yet to be saved. Once creating a new line item, the next steps are to fill out the necessary fields by populating each one individually and once complete clicking the ‘Save’ button.
The ‘Calculate’ button is used if volumetric data is entered in one unit and a volumetric conversion is setup to also include the volume in another unit.
The ‘Reset’ button is used to revert manually changes that have yet to be saved.
Any ticket that was entered into an asset using the run ticket template upload or manually entry can be updated via this grid.
For additional information on how each PDA method works and how to set them up, please refer to training page Physical Setup / Run Tickets.
Liquid Trans Setup / Physical Inventory
Physical Inventory can be entered into the system two different ways, the first is a manual entry into the Physical Inventory screen under Liquid Trans Setup. The other is using the Physical Setup / Run Ticket screen and uploading a file as you would for Run Tickets.
To enter physical inventory using the run ticket upload template follow the same steps outlined above to download the run ticket template.
The screenshot below outlines the required fields to upload physical inventory:
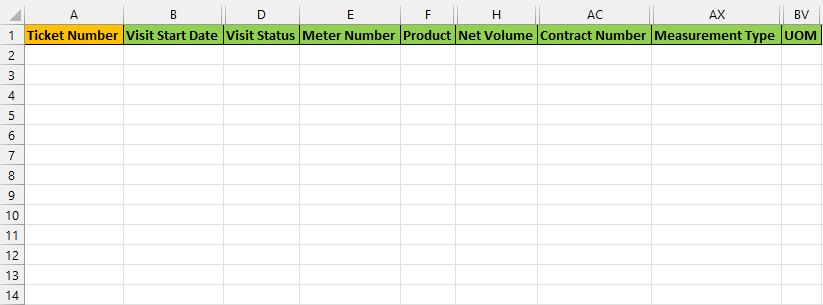
Ticket Number: This field is not required but if the user wishes to upload volumes in both barrels and gallons then this field will need to be populated. Important to note that the ticket number for every line item must be unique across all periods within a given asset
Visit Start Date: This is the date that the physical inventory volume will be applied to
Visit Status: Is a required field that is setup in the Visit Statuses code table
Meter Number: The meter that the given physical inventory volume will be assigned to
Product: The corresponding product for the given physical inventory volume
Net Volume: The Net Standard Volume
Contract Number: The corresponding contract that this physical inventory reading is for
Measurement Type: This must be set to ‘tank’ or ‘linefill’ depending on the type of inventory reading it is. Setting this field to tank or linefill tells the system that that is a physical inventory reading and should not be evaluated as a run ticket.
UOM: The unit of measure that the volume is in
If the client wishes to upload volumes in two units then they will need to make sure they populate ticket number as well as using the ‘Component Volumes’ sheet of the run ticket template as seen below:
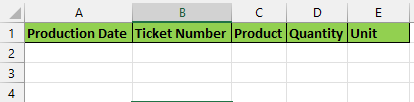
Production Date: Same value that was entered for Visit Start Date for the corresponding ticket number
Ticket Number: Same ticket number for the given physical inventory volume
Product: Same product for the given physical inventory volume
Quantity: This would be the Net Standard Volume in the other unit that the user wishes to enter
Unit: The unit of measure that corresponds to what the volume was measured in
Once all the necessary data has been inputted into the file then the user can upload it following the same process outlined to upload run ticket data
The user can also setup Physical Inventory manually by navigating to Liquid Trans Setup / Physical Inventory and manually adding the line items by clicking ‘New’.
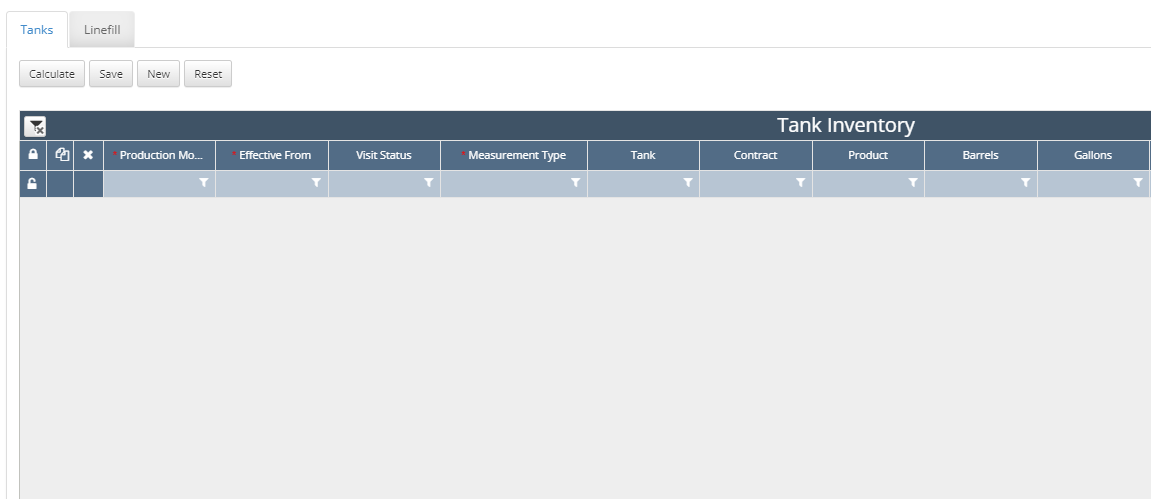
The key fields that are needed to setup manually can be seen above and outlined below:
Production Month: The month that the physical inventory volume is within
Effective From: The date of the physical inventory volume (Visit Start Date from run tickets)
Visit Status: Is a required field that is setup in the Visit Statuses code table (Visit Status from run tickets)
Measurement Type: tank or linefill (Measurement Type from run tickets)
Tank: The meter that the physical inventory volume is assigned to (Meter from run tickets)
Contract: The contract that the physical inventory volume is associated with (Contract Number from run tickets)
Product: The product that the physical inventory volume is for (Product from run tickets)
Barrels: The volume in units of barrels (Net Volume if UOM = bbl on run ticket)
Gallons: The volume in units of gallons (Using Component Volume sheet where Unit = gal)
Physical Inventory is sued to determine if there is any gain/loss for a given asset/shipper/product/meter. The logic for Transportation assets is that the physical inventory will equal the systems calculated ending book inventory unless a physical inventory record is available. A given days ending physical inventory will then roll over to the next day as that days opening inventory level.
For additional information on how each PDA method works and how to set them up, please refer to training page Liquid Trans Setup / Physical Inventory.
Liquid Trans Setup / Inventory Adjustments
Inventory adjustments can be used to enter beginning inventory into the system as well as make any adjustments to the month’s inventory balance for any given day.
To enter an inventory adjustment, navigate to Liquid Trans Setup / Inventory Adjustment and click ‘New' to create a new line item in the grid.

Fields with the * are required to enter an adjustment. All of the fields listed above are outlined below:
Production Date: Date that the adjustment is effective for
Quantity: The quantity of the adjustment
Adjustment Type: Beginning or Adjustment
Inventory Type: Allowance, Storage, or Linefill
Product: Associated product that the adjustment is for
Usage: Associated usage for the given product that the adjustment is for
Component: Specific component the adjustment is for if applicable
Unit: The unit of measure for the entered quantity
Receipt Meter: The receipt meter that the adjustment is attached to
Contract: Associated contract for the adjustment if applicable
Once all the required fields are populated with the correct information then click ‘Save’.
The adjustment entered here can be seen in the inventory result screen Book Inventory Transactions and plays a role in how ending inventory is calculated.
For additional information on how each PDA method works and how to set them up, please refer to training page Liquid Trans Setup / Inventory Adjustments.
Accounting / Accounting Components
Remaining
Asset Setup / Batch Processes
Batch Processes are a one time setup piece that are used to run the processes under Asset Process Control and drive the system populating results screens.
To setup batch processes, navigate to Asset Setup / Batch Processes:
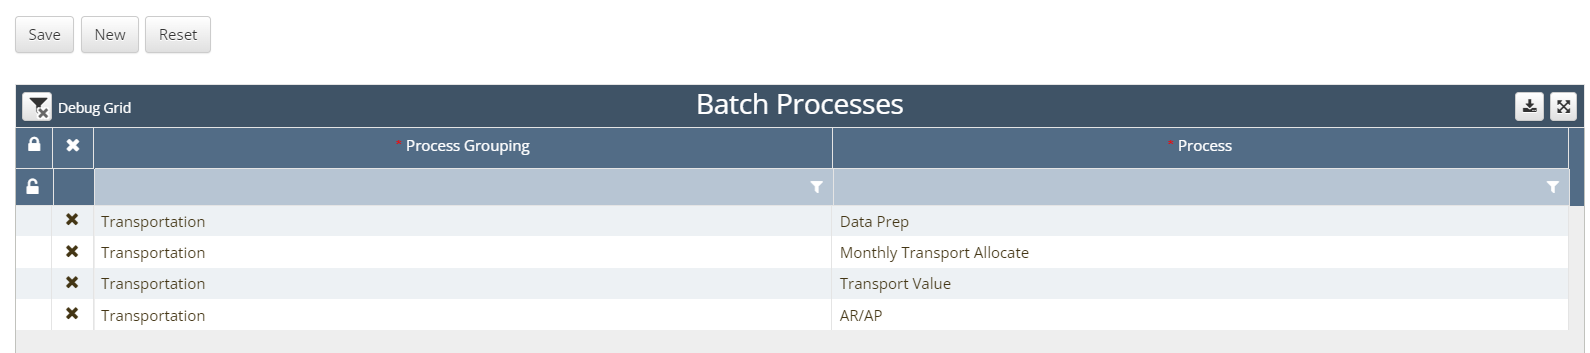
Click the ‘New’ button to add a new line item to the grid, from there the process group will be transportation and the following processes are what will typically be used:
Data Prep: Populated Levelled Run Tickets
Monthly Transport Allocate: Populates inventory and allocation result screens
Transport Value: Populates valuation results and other settlement result screens
AR/AP: Based on accounting/journal component setup, will populate accounting results
For additional information on how each PDA method works and how to set them up, please refer to training page Asset Setup / Batch Processes.
Asset Process Control / Process Control
The above steps were are needed to get to the step where processes can now be ran. Once all setup pieces are accounted for and all necessary data has been entered, the next piece is run the processes to populate the various results screens.
There are different processes that can be ran based on what the client’s needs are, the main ones to note are Daily Transport Allocate and Monthly Transport Allocate.
Daily Transport Allocate shows Shipper Allocations & Book Inventory Transactions at both the daily and monthly level.
Important to note that when running daily transport allocate and using tariffs, Valuation Results will be rolled up together and not at ticket level.
Monthly Transport Allocate shows Shipper Allocations & Book Inventory Transactions at only monthly level.
Liquid Trans Results / Shipper Allocations
Shipper Allocations shows volume allocated to each shipper according to run tickets or defined percentages or Operator Provided Values (OPVs) on Pre-determined Allocation (PDA) records. Shipper allocations will break out the results for each receipt meter, and delivery meter. Transport allocate can be run at either a daily or monthly level.
Liquid Trans Results / Movements
Movements shows movements generated between receipt and delivery points according to allocated shipper volumes. Allocation is performed on a pro-rata basis according to each shipper’s nomination or allocation method (available for sale volume, which is a sum of Beginning Inventory, Receipt Volume, with a deduction of any pipeline allowance (if applicable)). The movement quantity will equal the Delivery Shipper Allocation Quantity.
Liquid Trans Results / Available for Sale Results
Available for Sale Results shows a combination of beginning shipper inventory, allocated receipt and delivery volume, title transfers, deducted allowances, and resulting ending inventory for each shipper.
Liquid Trans Results / Book Inventory Transactions
Book Inventory Transactions shows the shipper/contract’s book inventory level based on Waterfield’s Calculations for each meter/product/Opening Inventory/ Receipts/ Deliveries/ Transfers/ Allowance/ Gain Loss/Gravity Adjustments/ Ending Inventory Balances. The Book Inventory Transaction screen is a summary of the Inventory Balances.
Book Inventory Transactions.xlsx
Contractual Results / Valuation Results
Shows results of all contract terms and fees applied within the tabs of each contract record, and any tariffs that are applied